Team Members
Tania Cano
Jordan Floyd
Donghwa Han
Celine Wang
Supervisors
Jack Mottley, PhD, Electrical and Computer Engineering, UR
Daniel Phinney, Adjunct Professor, Electrical and Computer Engineering, UR
Customers
We worked with L3Harris while we were still on campus.
Description
The AI Sorting System helps users sort their recyclable items into the correct category (plastic, metal, glass, or other). It takes a photo of a recyclable object, weighs it, and scans it with a metal detector. It inputs this data into a program that classifies the item as plastic, metal, or glass. Another program uses this data to make a final decision (whether the item is plastic, metal, glass, or other). The system includes 4 bins, one for each material. LEDs will light up on one of the bins and its lid will flip open, indicating that the recyclable should be placed in that bin.
Parts List
PARTS INVOLVING RASPBERRY PI:
Raspberry Pi 4
USB-C Power Supply for Raspberry Pi 4
MicroSD Card (64 GB)
Micro HDMI to HDMI cable (for Raspberry Pi)
IR Sensor
Raspberry Pi Camera
PARTS INVOLVING ARDUINO:
Arduino Uno
Arduino Power Supply
Arduino Kit
Scale (Arduino Compatible)
LED Strip (Arduino Compatible)
Servos & Servo Arms (4)
Metal Detector
Bins (4)
OTHER PARTS:
Laptop
Steps of Implementation
Step 1: Detect the Object
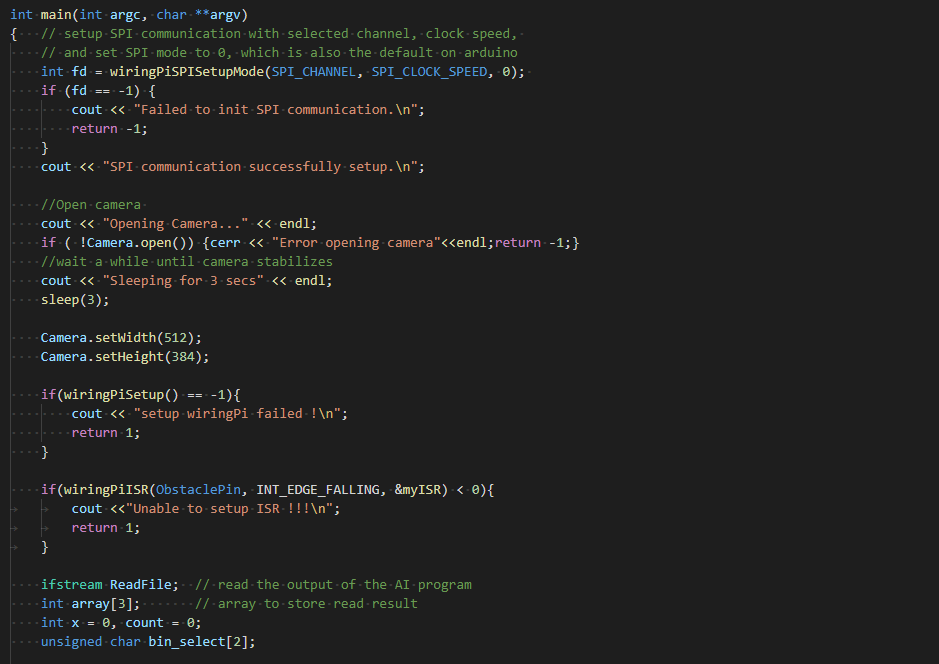
The diagram below shows connections between the IR obstacle sensor, Arduino, Raspberry Pi, and the Camera.

The IR sensor on the Raspberry Pi senses if an item has come to close proximity. The Raspberry Pi increments the item ID integer (which is saved to a text file).
Step 2: Take a Picture
The Raspberry Pi takes a picture using the camera module. The size of the image is 512 x 384 pixels.
Step 3: Take the Metal Detector & Scale Readings
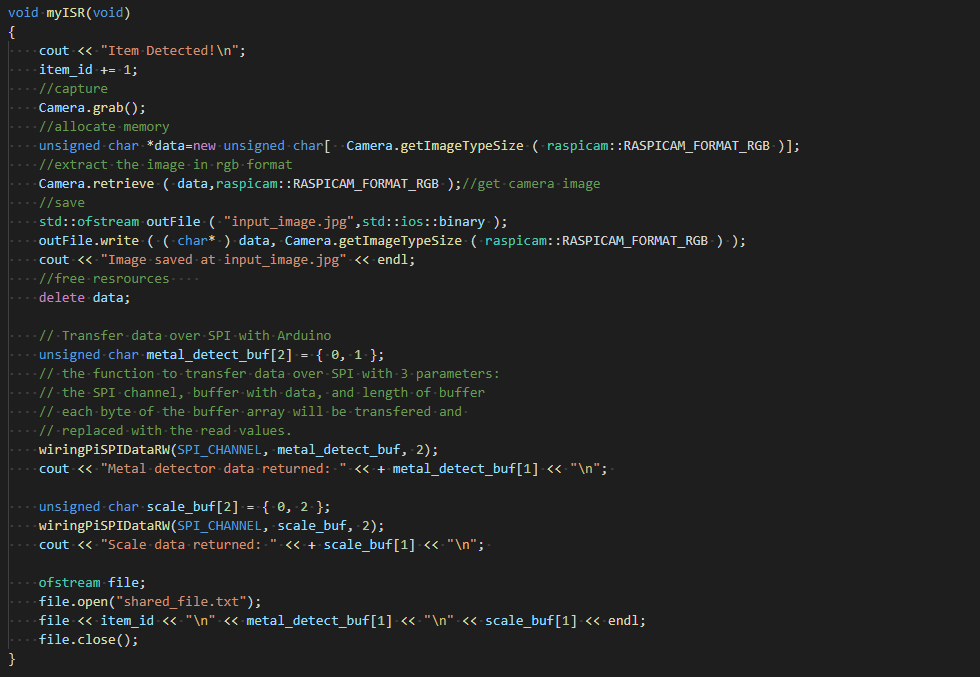
The Raspberry Pi sends a message to the Arduino by using SPI communication. In response, the Arduino takes the metal detector reading and scale reading.
SPI communication was chosen because it is synchronous, it allows the master (the Raspberry Pi) to initiate and control all communications, and it is full-duplex (data can flow in both directions simultaneously).
Two wires were used to connect between the microcomputer of the metal detector and the Arduino. The following video shows the Arduino reading the signal from the metal detector:
The scale consists of a load cell that can measure from 0-11 lbs and a high precision A/D converter chip, the HX711 module.
The following Arduino sketch uses the scale to measure the mass of the object.
#include <Q2HX711.h>

const byte hx711_data_pin = 2;
const byte hx711_clock_pin = 3;

float y1 = 100.0; // calibrated mass to be added
long x1 = 0L;
long x0 = 0L;
float avg_size = 10.0; // amount of averages for each mass measurement

Q2HX711 hx711(hx711_data_pin, hx711_clock_pin); // prep hx711

void setup() {
  Serial.begin(9600); // prepare serial port
  delay(1000); // allow load cell and hx711 to settle
  // tare procedure
  for (int ii=0;ii<int(avg_size);ii++){
    delay(10);
    x0+=hx711.read();
  }
  x0/=long(avg_size);
  Serial.println("Add Calibrated Mass");
  int ii = 1;
  while(true){
    if (hx711.read()<x0+10000){
    } else {
      ii++;
      delay(2000);
      for (int jj=0;jj<int(avg_size);jj++){
        x1+=hx711.read();
      }
      x1/=long(avg_size);
      break;
    }
  }
  Serial.println("Calibration Complete");
}

void loop() {
  // averaging reading
  long reading = 0;
  for (int jj=0;jj<int(avg_size);jj++){
    reading+=hx711.read();
  }
  reading/=long(avg_size);
  // calculating mass based on calibration and linear fit
  float ratio_1 = (float) (reading-x0);
  float ratio_2 = (float) (x1-x0);
  float ratio = ratio_1/ratio_2;
  float mass = y1*ratio;
  Serial.print("Raw: ");
  Serial.print(reading);
  Serial.print(", ");
  Serial.println(mass);
}

Code Source: https://makersportal.com/blog/2019/5/12/arduino-weighing-scale-with-load-cell-and-hx711
Step 4: Communicate the Data
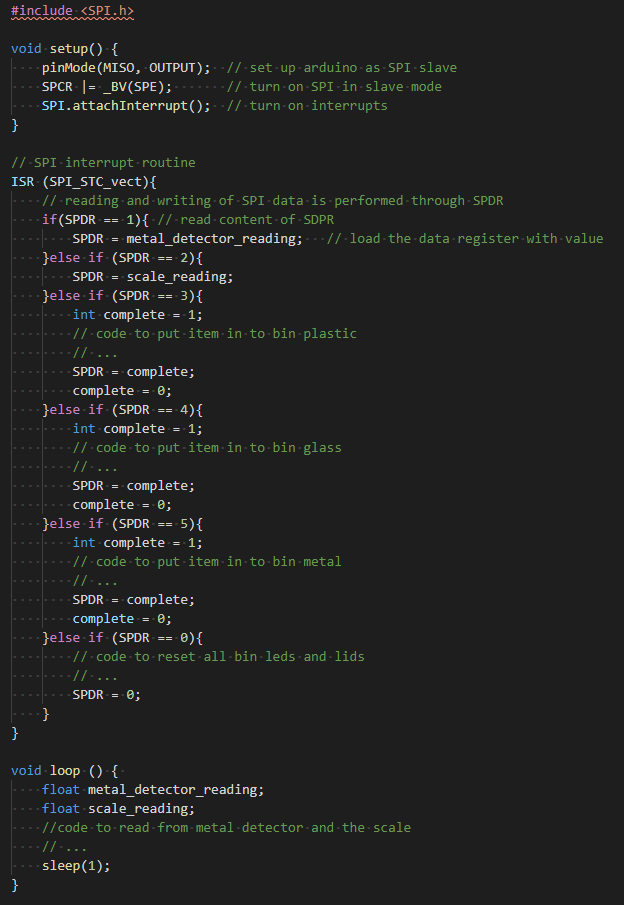
The Arduino sends the data from the metal detector and the scale to the Raspberry Pi by using SPI communication. The following Arduino sketch sets up SPI communication and sends the data.
Step 5: Save the Data into a File
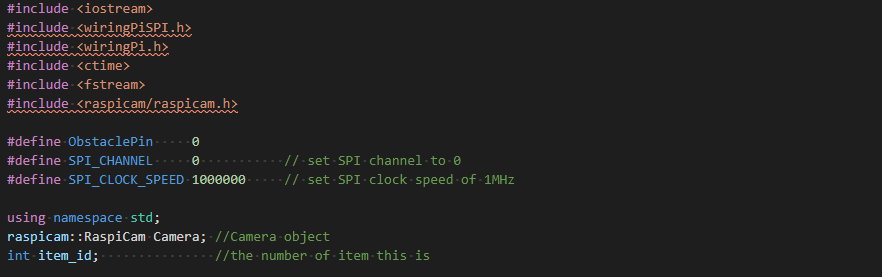
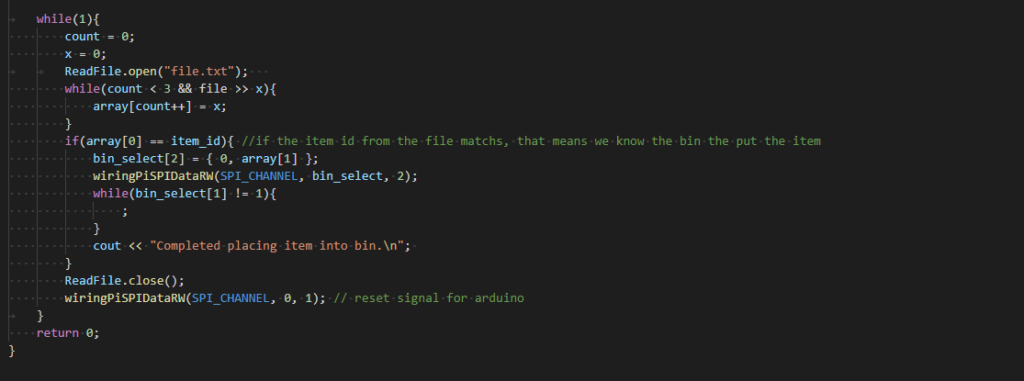
The Raspberry Pi saves the picture, the item ID, and the readings from the metal detector and the scale to a shared folder between the Raspberry Pi and the laptop. The path to this folder is the same as what is specified in the image classification program. The image will be always be named input_image.jpg. The code for Pi to do step 1-5 as well as 9-10 is shown as follows:
Step 6: The Laptop Waits for the Data
The program on the laptop reads the item ID repeatedly until it sees an update, which means a new set of data is ready to be classified.
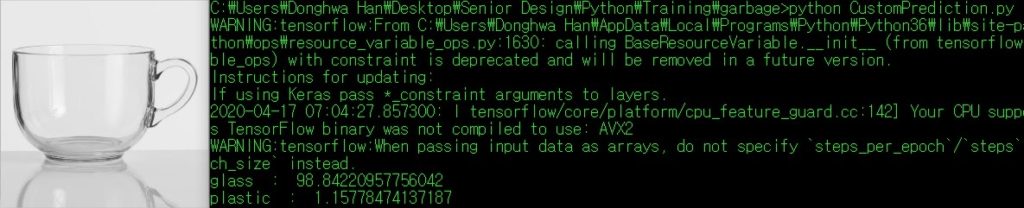
Step 7: Classify the Image
The image classification program takes in the image that was saved at the aforementioned path. It uses a custom model that we trained using a Python library called ImageAI. (Its documentation can be found here.) The model was trained to distinguish between plastic, metal, and glass objects. After the program runs, it displays the probabilities that the item is each material.
ImageAI supports transfer learning; that is, you can borrow a pre-trained model and use it to facilitate your custom training. despite limited training data. This practice promises much higher accuracy and substantially reduces training times. Our model is a custom application of ResNet, which is a classic neural network model popular for computer vision.
Such training requires high performance computing power, i.e. powerful GPUs. It may take hours or days on a regular business laptop without an external GPU.
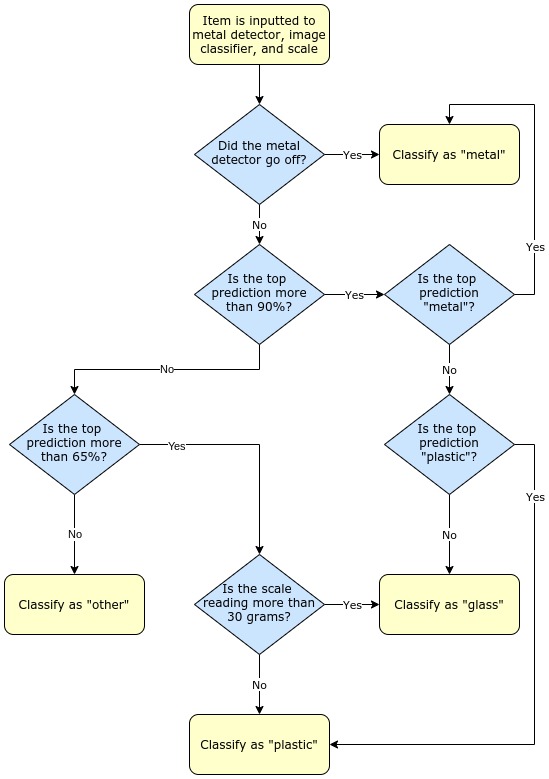
Step 8: Run the Decision Tree Program
When the image classification program ends, another program takes in the data from the metal detector, the scale, and the image classification program. Based on these values, the program determines which category the item belongs to (plastic, metal, glass, or other). Below is a decision tree that illustrates this program.
Step 9: The Raspberry Pi Waits for the Result
The Raspberry Pi checks the text file continuously until the item ID inside the text file matches what it is looking for. This means the decision tree program has ended and the result is available.
Step 10: Communicate the Final Decision to the Arduino
The Raspberry Pi sends the final decision to the Arduino by using SPI communication.
Step 11: Communicate the Final Decision to the User
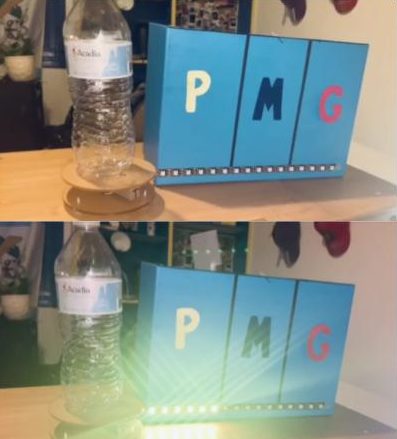
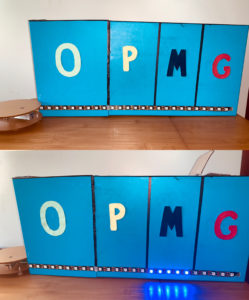
A prototype was built consisting of the four servo motors, the RGB LED strips, an Arduino Board, and the scale.
The following Arduino sketch uses the final decision “x” to determine which LEDs to light up and which servos need to change position. (The servos are used to flip open the lid of the bin.) After about 8 seconds, the LEDs turn off and the servos return to their original position.
#include <FastLED.h>
#include <Servo.h>


#define LED_PIN     7
#define NUM_LEDS    20
#define DT A0
#define SCK A1


CRGB leds[NUM_LEDS];

// Declare the Servo pin
int servoPin1 = 3;
int servoPin2 = 5;
int servoPin3 = 6;
int servoPin4 = 9;

// Create a servo object
Servo Servo1;
Servo Servo2;
Servo Servo3;
Servo Servo4;


void setup() {
  FastLED.addLeds<WS2812, LED_PIN, GRB>(leds, NUM_LEDS);
  // Attach the servo to the used pin number

  Servo1.attach(servoPin1);
  Servo2.attach(servoPin2);
  Servo3.attach(servoPin3);
  Servo4.attach(servoPin4);

}
// If the the the program clasifies object as Glass then x = 1
// If the the the program clasifies object as Metal then x = 2
// If the the the program clasifies object as Plastic then x = 3
// If the the the program clasifies object as Other then x = 4


void loop(){

  //starts the servos at the "closed" position
  Servo1.write(90);
  Servo2.write(90);
  Servo3.write(90);
  Servo4.write(90);

  //if object is glass

  if (x == 1){

    for (i = 0; i < 5; i++) {
      leds[i] = CRGB ( 255, 0, 0); //will light up the LEDs(RED) on plastic bin
      FastLED.show();
      delay(500);
    }

    Servo1.write(180); // open the lid on plastic bin
    delay(8000);
    Servo1.write(90); // close lid
    for (i = 0; i< 6; i++){
      leds[i] = CRGB ( 0, 0, 0); // turn off all LEDs
      FastLED.show();
    }

    x = 0; // exit loop
  }

  else if (x == 2){ // If object is metal
    int i = 5; //Check if this line is needed
    for (i = 5; i < 10; i++) {
      leds[i] = CRGB ( 0, 255, 0); // Turn LEDs(BLUE) on Metal bin on
      FastLED.show();
      delay(500);
    }
      Servo2.write(180);
      delay(8000);
      Servo2.write(90);

      for (i = 5; i< 10; i++){
      leds[i] = CRGB ( 0, 0, 0); // Turn LEDs off
      FastLED.show();
      }

      x = 0;
    }

//If object is plastic
  else if (x == 3){
    int i = 10;
    for(i = 10; i < 16; i++){
      leds[i] = CRGB ( 127, 127, 0); //Turn LEDs (Yellow) on
      FastLED.show();
      delay(500);
    }

      Servo3.write(180);
      delay(8000);
      Servo3.write(90);

      for (i = 0; i< 16; i++){
      leds[i] = CRGB ( 0, 0, 0); // Turn LEDs off
      FastLED.show();
      }

      x = 0;
    }

    else if (x == 4){
    int i = 16;
    for(i = 16; i < 21; i++){
      leds[i] = CRGB ( 0, 0, 255); //Turn LEDs(GREEN) on
      FastLED.show();
      delay(500);
    }

    Servo4.write(180);
    delay(8000);
    Servo4.write(90);

    for (i = 16; i< 21; i++){
      leds[i] = CRGB ( 0, 0, 0); // Turn LEDs off
      FastLED.show();
    }

    x = 0;
    }
}
Step 12: Repeat
If there is another object that needs to be classified, the process can be started again from Step 1.