Project Description
Drone projects seemed to have gained a poor reputation for senior projects within the ECE department. Plagued with the challenges introduced by a 3rd degree of motion, gravity, and a higher price tag, groups that attempt these projects seem to encounter less success than others. Ignoring both the advice from other students and professors, we decided to move forward with the idea of a drone project anyway. Our goal was simple: create a fleet of fully autonomous drones which could work together to map out an area while simultaneously localizing their position in the world. A project like this could see use in search-and-rescue, industrial surveying, and exploratory applications.
The theory behind our project was not groundbreaking or new. The SLAM (Simultaneous Localization and Mapping) algorithms that we intended to use have been around since the early 1990s. Most of our group had taken the ECE department’s 232 course, Autonomous Mobile Robotics, which provided both the theoretical and practical knowledge required for us to get started. Our challenges lay in implementing what we had learned into a drone specifically. The margins of error had to be reduced, the uncertainty increased, and the computational challenges had the potential to skyrocket exponentially. Any one problem, whether it being a poorly optimized algorithm or a broken drone that had crashed to the ground, had the potential to delay or break our project. Though we were ultimately not able to achieve a fleet of mighty smart drones, our progress does bode well for future groups who wish to give the challenge of drone programming a try.
Design Process
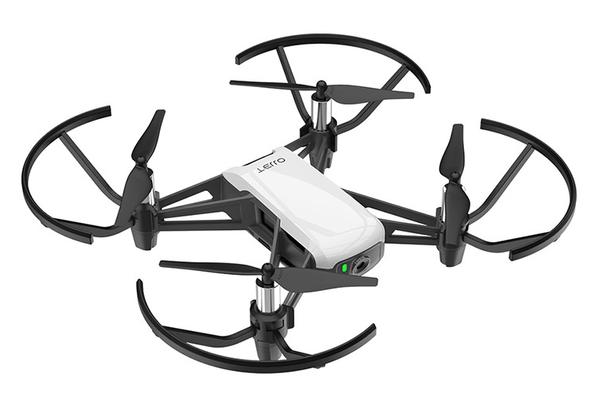
Our group had already picked a platform to use for our project during the previous semester’s reverse engineering assignment. Ryze Tello made a small, relatively inexpensive, drone which had gained a reputation of being exceptional for student projects. Drivers had already been developed to control the drone from a computer and we had found similar projects suggesting the drone camera could support SLAM algorithms. We quickly moved past the hardware phase and dove straight into a software research phase.
The first several weeks of research went into setting up Linux virtual machines, interfacing with the drone, and experimenting with different driver packages and existing libraries for us to utilize in our project. We decided early on to use ROS (Robotics Operating System), a robotics-oriented middleware, as we had already developed a good understanding of it from the Autonomous Robotics course. The majority of Tello drivers we had found also utilized ROS which allowed us to quickly start sending commands to and receive data from our drone. The decision to use ROS also pushed our group towards all working within Linux, which required us all to setup virtual machines on our personal laptops. This research phase was critical in getting our group on the same page and preventing any poor early design decisions. We moved on once every one of our team members could send commands to the drone from their personal laptops.
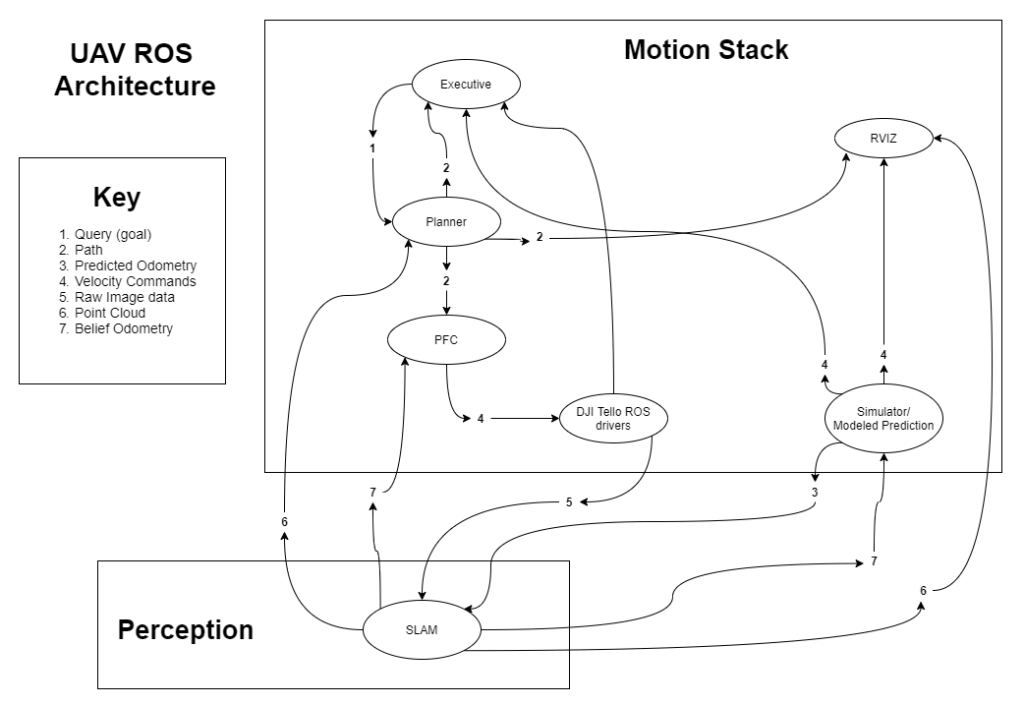
After this initial research phase, we started to focus on the design of the ROS software architecture. This consisted of isolating the various problems (planning, motion-modelling, localization and mapping, etc.) into separate processes which we could dole out and work on separately. Although the overall architecture faced several revisions over the duration of the semester, it remained relatively the same, consisting of two major components, a motion stack and a perception stack – fusing the Sense-Plan-Act control methodology commonly encountered in robotics. The motion stack consisted of everything required for the drone to create a path to chosen destinations and follow that path to its destinations. The perception stack consisted of everything required for the drone to use its camera to localize itself in the world and map out the world around it. The design phase was the shortest, only lasting about a week and a half, before we simply began coding.
We focused on implementing the motion stack first. Each group member was assigned a node to work on and everyone attended meetings twice a week to test and debug our progress. This was the longest phase of the project, as it simply took time to work through and debug every aspect of the drone’s motion. Up until the very end during testing, different parameters – namely gains in motion controllers, tolerances in path planners, etc. – were being tweaked for the drone to move smoothly, and correctly.
After several group members had finished their tasks working within the motion stack, they moved on to begin working with the drone’s perception. We had no interest, and especially not the time, to implement our own version of SLAM. Therefore, a lot of research was put into what SLAM libraries were available to us and which would work best utilizing the drone’s monocular camera. Ultimately, a library which utilizes ORBSLAM, a feature-based SLAM algorithm, was found and chosen for our project. We then began the process of tweaking it for our use and running calibrations to determine various drone camera characteristics required by the ORBSLAM library.
As the motion stack and perception stack were both being finalized, we ended up transitioning into a final testing phase. This consisted of the last couple weeks before the end of the semester when most of our code had been written but needed testing with the physical drone instead of our virtual simulator. As expected, this was a period of rampant bugs and unexpected behavior. Every poor coding and design decision returned at this point to haunt us. In the end, we were able to achieve basic autonomy and with a successful SLAM implementation, although the reliability does suffer and more time would be required to achieve a fully polished product.
Architecture
Tello Interface- We ended up choosing the ROS endorsed Tello driver after comparing several of the options available to us. It works by sending UDP messages back and forth with the drone which exchanges commands and various status properties. Choosing a driver early in our design process allowed us to get started much faster than if we were to create our own messaging protocol. We faced early problems regarding the computer/drone connections when we were working inside VMs. We were able to overcome this by using a USB wireless antenna. Eventually, we switched to a native machine Linux machine during the final testing phase.
Planner– The planner is responsible for calculating the shortest path between any two points comprised of an x, y, and z coordinate. The planner can read in a set of obstacles described as a point cloud in the perception node and dynamically. In order to accomplish this task, the well-known graph traversal and path search algorithm A* was implemented. Using the output of the planner, the path following controller is able navigate to desired waypoints.
Simulator/Motion Predictor– The simulator takes in velocity commands and makes an estimation of the drone’s pose. This was used for testing in our visual simulator and allowed us to confirm the accuracy of the PFC. We originally hoped to use the simulator to help predict the belief odometry, but it proved too inaccurate in testing.
Path-Following Controller– The path following controller (PFC) takes the path calculated by the planner node and determines the proper velocity of the drone so that the motion follows the track. When the drone is far from its goal point the PFC looks at the point 30 cm ahead on the planned-out path and uses PID control to determine the magnitude of both the necessary angular and linear velocities. If the goal is within 30 cm of the drone, it will only look 10 cm ahead.
Executive- The executive node oversees the validation process of navigation, coordinates requests to the planning node, and controls the takeoff and landing procedures for the drone. The executive manages the specific waypoints to navigate to as well as scaling odometry data from the perception stack.
Visualization/GUI– We initially attempted to use Gazebo for visualization, but it proved cumbersome and unnecessary, primarily because we did not need its physics simulation capabilities. We ended up switching to RVIZ (Robot Visualization), a 3-d visualization tool specifically designed for ROS applications. We were able to use it to subscribe to ROS messages and display our simulations in a graphics application. One of the challenges we faced was understanding relative frames. We fixed our problems with this by creating a ROS node to perform transformations between the base frame of the drone to the world frame.
Perception – DJI Tello’s forward-facing and downward-facing cameras were used for the sensing requirements of this project. The latter camera was primarily used to track the platform’s vertical displacement, facilitating the maintenance of a minimum vertical displacement, while the former camera was used for mapping and localizing (SLAM) the drone with respect to the environment. A common pitfall with projects like this is the necessity of plastering the lab environment with many tags. To avoid use of tags, we opted for a feature-based monocular SLAM named ORBSLAM, which produces a spare 3D reconstruction of the drone’s scene and tracks the drone’s trajectory using keyframes.
A challenge of the perception stack was to add the necessary infrastructure to generate a 3D point-cloud, save/load pre-generated maps, and publish transformations between the trajectory obtained through SLAM and the world frame.
Demonstrations
The following demonstration shows the architecture navigating autonomously to several waypoints while trying to build a map of the environment for localization. The final goal was to navigate above the ceiling light fixture, which ended in an emergency automated landing.
Autonomous mapping of the laboratory environment seen through RVIZ.
Autonomous mapping of the laboratory environment recorded through a mobile device.
Autonomous navigation around the Hopeman laboratory.
Takeaways
This project proved to us that drone projects do in fact come with a large number of exciting unexpected problems. We could not have predicted the large amount of tweaking required to end up with a reliable rate of success. We are, however, happy with the level of autonomy we were able to achieve considering the constraints of the semester.
Team Members
- Abrar Rahman
- David Webster
- William “Jay” Williams
- Lord of Macros Zeyu “Chandler” Xu
- Professor Mottley- Advisor
- Professor Phinney- Advisor