Team Members
- Ethan Lin
- Matthew Lucht
- Leon Peng
- Ekko Wu
- Andrew Yuan
Advisors
- Irving Barron
- Jack Motley
- Daniel Phinney
Abstract
In this project, we have designed an “ML-Driven Wirelessly Controlled Robot” that uses machine learning to detect objects of a given class and automatically navigate towards the nearest object of that class found within its camera view. The robot does not use any external sensors, detectors, or modules to perform this task, and is able to detect over 80 different classes of objects. The robot can be controlled via three modes: Physical Joystick, ML Object Detection, and Web‑Based Virtual Joystick. The goal of this project is to serve as a starting point for designing a robot which may be used to find or travel to objects on campus, potentially for use in transporting items to specific locations, or automatically tracking lost items without human effort.
Design Pipeline
Hardware Components
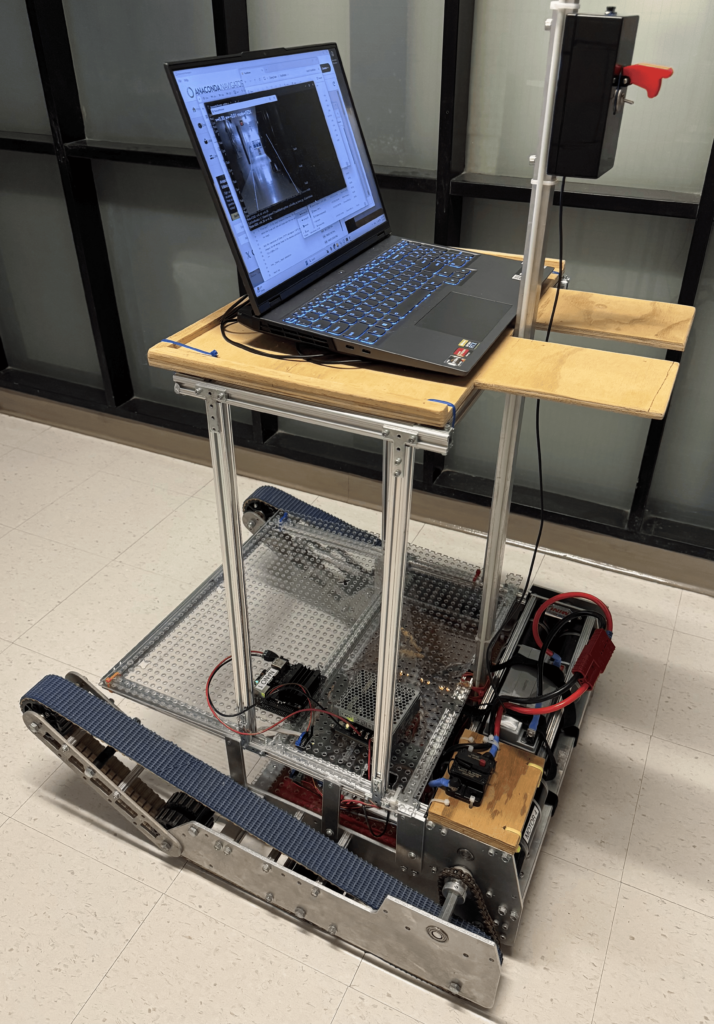
- “Rhino” Robot
- Nvidia Jetson Nano
- HERO Control Board
- UART Pin Connector
- Laptop
- Logitech Camera
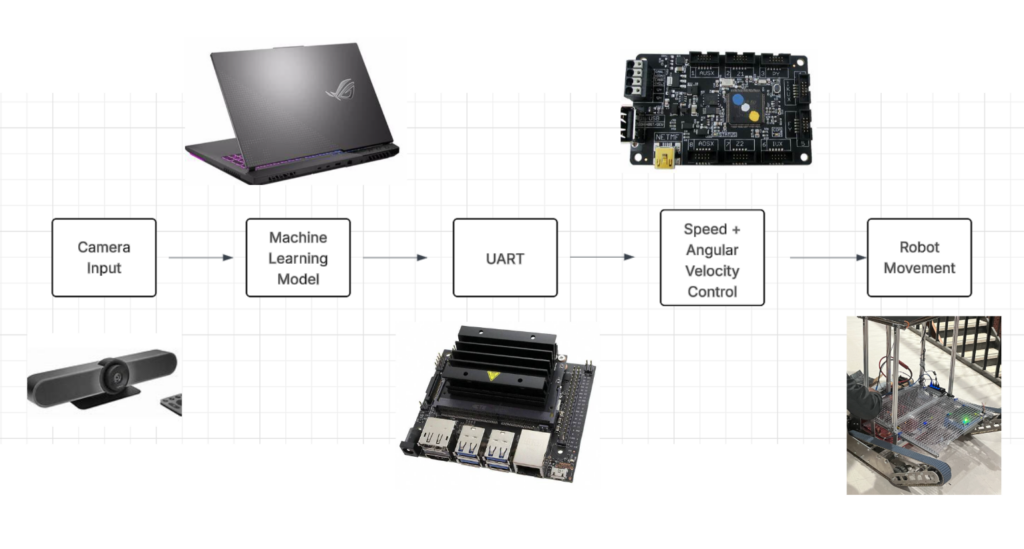
From a high level, the computer uses machine learning to detect objects of interest within the camera’s view, which is mounted onto the robot. The object with the highest confidence rating is selected, and the speed and angle at which the robot must move to reach the object of interest is calculated. This information is then published to the Nano via UDP, which sends the required speed and angle to the HERO control board as a string through UART. The HERO board is configured to receive this string and move the wheels of the robot accordingly; this process is then repeated, with the camera adjusting the necessary speed and angle, and sending the adjusted values incrementally through the pipeline. Additionally, user commands from a web-based virtual joystick hosted by a computer are received by a Flask server on the computer and forwarded via the same UDP/UART pipeline to the Nano, providing remote control functionality.
Software
Jetson Nano
The Nano is used as a bridge which allows the machine learning algorithm to more easily communicate with the HERO. The Nano receives speed and angle inputs sent out by the machine learning algorithm from the computer wirelessly, and publishes those inputs to the HERO Board on the robot using UART. A segment of the UART program is shown below:
uart = serial.Serial('/dev/ttyTHS1', baudrate=115200)
sock = socket.socket(socket.AF_INET, socket.SOCK_DGRAM)
sock.setsockopt(socket.SOL_SOCKET, socket.SO_REUSEADDR, 1)
sock.bind(('0.0.0.0', 8888))

print("Jetson is listening on port 8888")

while True:
    data, addr = sock.recvfrom(1024)
    command = data.decode('utf').strip()
    print(command)
    uart.write((command  + '\n').encode('utf-8'))
The Nano is explicitly designed to run machine learning programs, and is able to directly interface with our camera; theoretically, the machine learning should be able to run on the Nano locally without the need for a connected laptop. However, the program simply did not run fast enough with just the Nano; for all intents and purposes, it is simply more efficient to use a computer to run the machine learning model, though it is possible that optimizations could be made which allow the Nano to run faster.
HERO Board
The HERO Board is embedded in the robot, and communicates directly with the motor of the robot. It is programmed in C# to read speed and angle inputs, and rotate the motors in accordance with these parameters. Speed and angular velocity are read by the program as “v” and “w”, respectively; the motors which they control are denoted as “talons”. A snippet of the code which converts v and w is shown below:
static void Drive(float v, float w, bool isUART)
        {
            if (isUART)
                v = -v;

            float leftThrot = v + w;
            float rightThrot = v - w;

            leftThrot = Clamp(leftThrot, -1.0f, 1.0f);
            rightThrot = Clamp(rightThrot, -1.0f, 1.0f);

            left.Set(ControlMode.PercentOutput, leftThrot);
            leftSlave.Set(ControlMode.PercentOutput, leftThrot);
            right.Set(ControlMode.PercentOutput, -rightThrot);
            rightSlave.Set(ControlMode.PercentOutput, -rightThrot);
        }
Independently of the machine learning model, speed and angular velocity may be inputted manually via Physical Joystick, the ML Object Detection mode, or the Web-Based Virtual Joystick; the machine learning automatically sends these inputs derived from the camera input using the Nano, as previously described.
Machine Learning Model
We are deploying the computer vision model from Ultralytics, YOlOv8. YOLOv8, pre-trained with COCO-2017, can detect 80 classes. There are 5 yolov8 models, based on the parameter numbers. We are using the medium version, which has 25M parameters. A post-processing is combined with YOLOv8m to do the Computer Vision work and send v and w to the control. Here is a brief Pipeline: Video as input from camera, processed by yolov8m model and grouping all detected objects into target and obstacles, generating v and w based on where the target appearing on the camera and also where the obstacles appearing on the camera, sending v and w as string to the control. In the post-processing, a state machine is used. There are 4 states: Seek, Backup, Avoid, Find. Seek is the state that the robot see the target and try to approach it; Backup is the state that the robot find obstacle being too close and move backward to keep safe distance; Avoid is the state that the robot turns left and right, and try to pass the obstacle; Find is the state that the robot lost the target and try to find it back based on where the target disappeared. All four targets are triggered under certain conditions and run smoothly with each other to achieve the robot approaching target task.
Joystick Web Controller
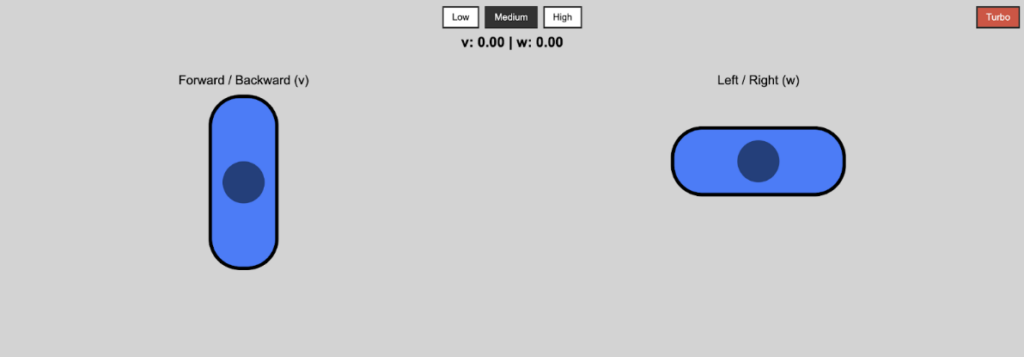
In addition to the machine learning model, the robot may also be controlled remotely from an external website. The web joystick runs in a web browser and connects to a Flask server on the control computer to provide truly real‑time robot control. On the page you see two virtual joysticks: one that moves up and down to set the robot’s linear velocity (v) and another that moves left and right to set its angular velocity (w). Every 50 ms, the browser reads both stick positions, calculates v and w, automatically flipping w when you drive backward so turning feels natural. The v and w values are displayed in the center of the interface, and sends them via HTTP to Flask. The server immediately wraps them into a UDP packet and forwards it to the Jetson Nano. When you release the stick, it smoothly drifts back to center and resets its value to zero, bringing the robot to a stop. To suit different driving styles we implemented four speed modes, low (|v| ≤ 0.3), medium (|v| ≤ 0.6), high (|v| ≤ 0.8), and turbo (|v| ≤ 1.0), all selectable in the UI. We tested the system over the university’s campus Wi‑Fi and confirmed stable, responsive control anywhere within coverage.
Results
The program runs smoothly, with the robot able to successfully navigate towards any of the objects identifiable by the machine learning algorithm. Below are video examples of the robot navigating towards a person:
In the event multiple objects are detected within the camera view, the object with the highest confidence will be selected, and moved towards (as in, the robot will move towards the object with the highest probability of actually being the object that the machine learning model is looking for).
The obstacle avoidance program is able to navigate the robot around obstacles in the way of an object by detecting them with the camera, backing the robot up and turning around them. This works by the machine learning program reactively switching between “SEEK” mode where it drives toward the selected object, “BACKUP” mode where it turns away from detected obstacles, and “FIND” mode where it turns the camera, searches for the original target object. Once the object is found, the machine learning is switched back into “SEEK” mode and resumes driving toward it. Below are videos of robot successfully navigating around simulated obstacles while moving toward a chair:
The Website Joystick UI also works, with each speed button successfully configuring the speed of the robot. A video of the robot being controlled via. Joystick Website is shown below:
Further Work
As described previously, the machine learning model should be able to run on the Nano alone; in testing, this was simply too slow. More work may be done to optimize the program, such that the Nano may need to make less computations per iteration, so that it may run the program at an acceptable speed. The machine learning model may be tuned to increase the number of detectable classes of objects, or selectively select certain objects of the same class over another when multiple are detected at once, i.e. choosing one chair over another based on characteristics inputted by a user. An option to activate the machine learning “mode” via the joystick website could also be added, with more time. Lastly, the same pipeline could potentially be used for any device where a camera is mountable, as long as the board which controls the movement of said device is configured correctly. Adjustments could be made such that a drone or different robot would be able to perform the same navigation, which could be an interesting project for future teams.
Archive of Work
Below is a link to our GitHub repo, where all the code we did for this project is archived. https://github.com/JiajunWu107/TrackRobot/tree/main
Acknowledgements
We would like to thank Professor Mottley, Professor Barron, and Professor Phinney for their guidance and technical assistance. We would also like to thank Tabib Wasit Rahman for his expertise with programming the robot, and his great help in developing our project pipeline.